Using Ciiva SmartParts in Altium Designer
Contents
- Part Analysis and Searching
- The SmartParts Document
- Working in the PartsDoc Document
- The Design View
- The Supply Chain View
- The Technical View
- Finding Suitable Parts
- Enabling Suppliers
- Automated Part Analysis
- Changing the Proposed Component
- Searching for a Part Based on an Existing Component Parameter
- Checking the Part Details in Ciiva
- Changing the Chosen Supplier
- Analysis Complete - Updating the Design Components
- Bringing Design Changes in to the PartsDoc
- Managing your SmartParts - Synchronizing to the Vault
You'd think that the most challenging aspect of electronic product development would be how the critical circuit functionality can be achieved, or how you can route those high-speed signals across and through the board. But no, one of the most challenging (and sometimes most frustrating) aspects of electronic design is generating the Bill of Materials.
It should be simple, right? But it is isn't, because transmuting the knowledge of the component that you want, from your head, into a specific manufacturer and supplier part number in the BOM, takes time, effort and close attention. But without that information, your amazing new device cannot be built.
Wouldn't it be great if you could somehow extract all of the component information from your design and use that to search for suitable components, complete with manufacturer and supplier details?
Now you can, with the Ciiva SmartParts. Ciiva SmartParts are available in Altium Designer when the Ciiva SmartParts Extension is installed.
This extension performs the following functions:
- Performs a detailed analysis of all of the parametric data in each component in your design, and then searches both your hosted Altium Vault and the millions of component records in the Ciiva database for the best match.
- Presents all of the component details in a spreadsheet-like table; complete with detailed views into the design data, Ciiva data and supply chain data.
- Supports user-override of any found component.
- Supports pushing details of found components into your design components, from there you can generate a detailed BOM.
- Supports pushing details of found components into your hosted Altium Vault, ready for use in the next design.
Part Analysis and Searching
The core of the extension is the part analysis engine, which is referred to as the Intelligent Content Detector (ICD). This software engine performs a sophisticated analysis of each unique part in the design, parsing all available parametric component data, applying both analytical and heuristic techniques to build a data model that can be used to guide the Ciiva searching process. Using the data model created by the Intelligent Content Detector, the extension searches Ciiva and your hosted Vault, presenting the parts that it finds in a PartsDoc document.

The Intelligent Content Detector extracts component details from the schematics, then searches Ciiva and the Vault, presenting the results in a PartsDoc.
The SmartParts Document
Once part analysis is complete, a new PartsDoc document is created and added to the project.
The document presents each unique part that has been placed in the design in a separate row of a spreadsheet-like table, with multiple instances of the same component clustered together. You can think of the PartsDoc as command central, where you map the design components to real-world parts.
The PartsDoc has a fixed region of 4 columns on the left side, with a scrollable region on the right side. The number of columns displayed on the right depends on the current view, with each view having a variable number of columns, depending on the available data.

Select the required View mode at the top of the PartsDoc, the displayed columns will change, as described below.
The function of each of the fixed columns on the left is:
| Column | Function |
|---|---|
| Manufacturer Part | Manufacturer part number from the matched part found in Ciiva |
| Designators | Designators of all schematic parts that have been found to match this Ciiva part |
| Description | Short description from Ciiva |
| Confidence | The Confidence score is designed to reflect the likely hood that the part chosen by the ICD is the correct part for your design. Below the percentage score it displays the matching method that was used to arrive at that score. Possible matching methods include: Each choice must be verified by the designer, paying particular attention to those parts with a confidence of yellow or lower. As tempting as it is to hope that the ICD will always find the correct part, it won't. There will be parts with insufficient detail, and others that are not in the Ciiva database. |
The PartsDoc document includes a number of view modes, to help manage the presentation of different aspects of the component data. The controls at the top of the document are used to switch from one view to another, these views are described in more detail in the following sections.
Working in the PartsDoc Document
The PartsDoc presents in a spreadsheet-like table, with each unique component on a row. On opening, the PartsDoc is sorted by the Designator column.
Within the document you can perform the following actions:
- Select the preferred view mode, click the required radio button at the top of the PartsDoc to change the view.
- Click in a column heading to sort alphanumerically by that column.
- Perform a quick string-based filter using the text box at the top of each column.
- To resize a column width, hover over the separator line to click and drag to resize, or hover and double-click to auto-resize.
- Right-click to copy content to the Windows clipboard.
- Select View » Filter from the menus to filter the table, by price, or to display only those parts without a solution.
- Select View » More Details from the menus to to display the table with large rows.
The Design View
This view mode shows all of the detail of each part placed in your design.
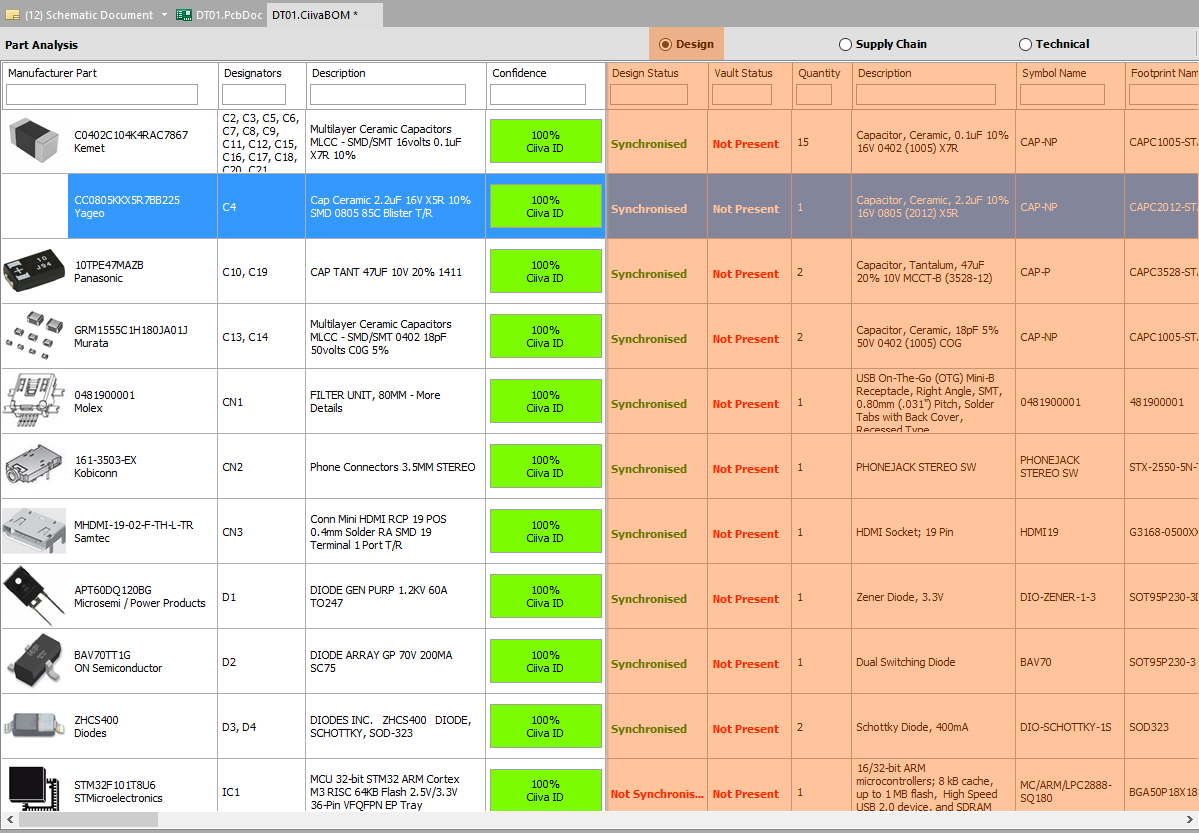
The Design view shows the component properties and parameters of the parts placed on the schematic sheet.
The first three columns in the Design view region have a specific function, which are explained in the table below. The rest of the columns are all of the parameters from all of the parts, listed in alphabetical order. These include default part parameters, such as Comment and Footprint, as well as the user-defined parameters.
| Column | Function |
|---|---|
| Design Status | Indicates if the part displayed in the PartsDoc has been synchronized with the part on the schematic sheet. Possible values include: |
| Vault Status | Indicates if the part displayed in the PartsDoc is also present in the hosted vault. Possible values include: N/A, Not Present, Present |
| Quantity | The number of instances of this part used in the project. |
| Source Design Parameters | All standard and user-defined part parameters (Description, Comment, Footprint, etc), for all parts in the design. |
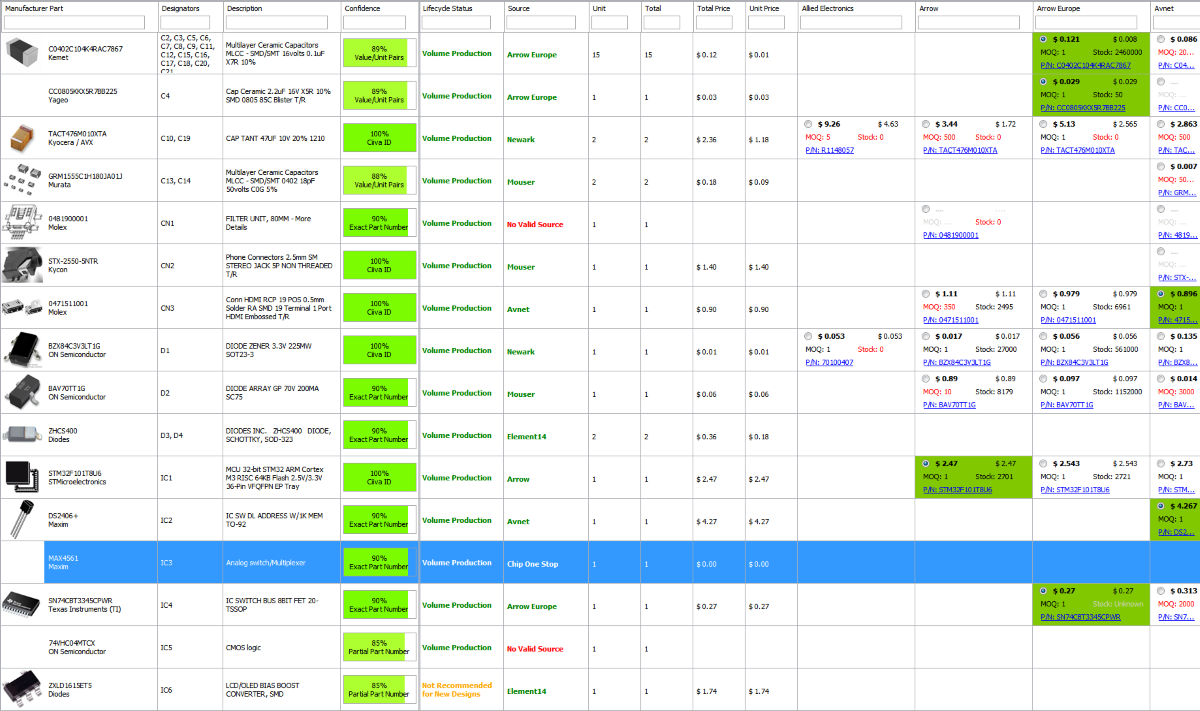
The Supply Chain View
This view presents the current supply chain availability and price. This detail is extracted from the Ciiva database. To make use of this view you need to enable your preferred supplier(s) in the Ciiva Analysis panel.

The Supply Chain view is used to select a supplier for each part. When the PartsDoc is created it defaults to the cheapest part for the number of units being built.
The columns in the Supply Chain view region have the following functions:
| Column | Function |
|---|---|
| Lifecycle Status | Indicates where the part is in its availability lifecycle. |
| Source | Chosen supplier for that part. Supplier is automatically selected from the enabled suppliers, based on offering the lowest price for the required quantity. |
| Unit | Quantity of this part needed |
| Total | Total number of these parts needed for the current batch. Batch size is set in the Ciiva Analysis panel. |
| Total Price | Unit * Unit Price |
| Unit Price | Unit price offered by the chosen supplier |
| Enabled Supplier(s) | A column of supply chain details are included for each enabled supplier. Switch to the More Details display mode (View menu) to display more details on each part, such as quantity price-breaks. To change to a different supplier, click the radio button at the top left of the new supplier's cell in the table |
The Technical View
This view displays all of the technical detail that is currently available for each of the chosen parts, extracted from the Ciiva database. This includes the case/package, operating temperature range, mounting style, packaging, and so on. Use this view to confirm that the suggested part is suitable.
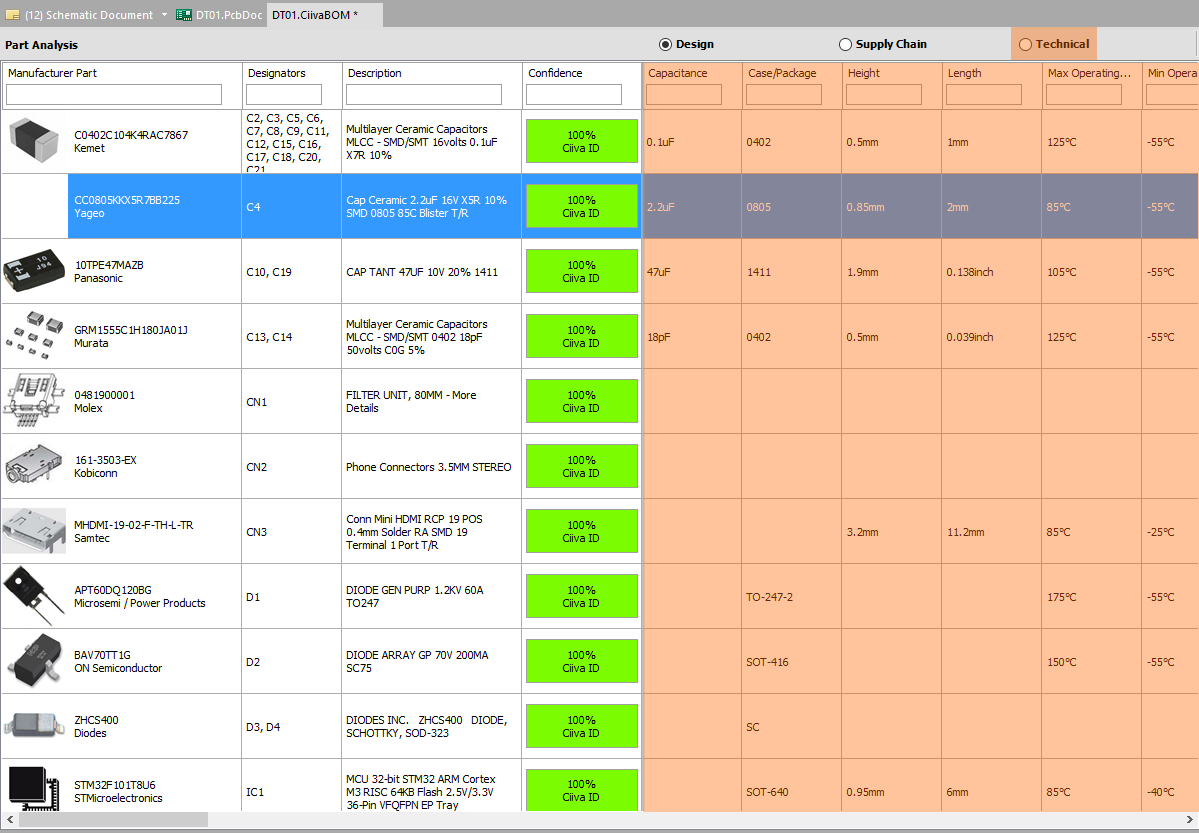
The Technical view shows all of the details available in the Ciiva database, for each part.
Finding Suitable Parts
The part analysis and searching process is automated, when you select the Ciiva Part Analysis command the Intelligent Content Detector begins its extensive parameter analysis process for each component, and then searches the Ciiva database and your hosted Altium Vault for a suitable part. When the analysis process is complete, you can configure your preferred suppliers, and then resolve any outstanding or low confidence parts.
Enabling Suppliers
Main pages: Ciiva Preferences, Ciiva Analysis panel
The Intelligent Content Detector locates suitable parts in the Ciiva database. To display supply information in the Supply Chain view, it needs to know your preferred suppliers. Preferred suppliers are enabled in the Supply Chain tab of the Ciiva Analysis panel, click the ![]() button down the bottom right of the application to display the panel, as shown below.
button down the bottom right of the application to display the panel, as shown below.
The Intelligent Content Detector collates supply chain data for all suppliers as part of the analysis process, so if you include/exclude suppliers at any time you will see the PartsDoc update immediately.
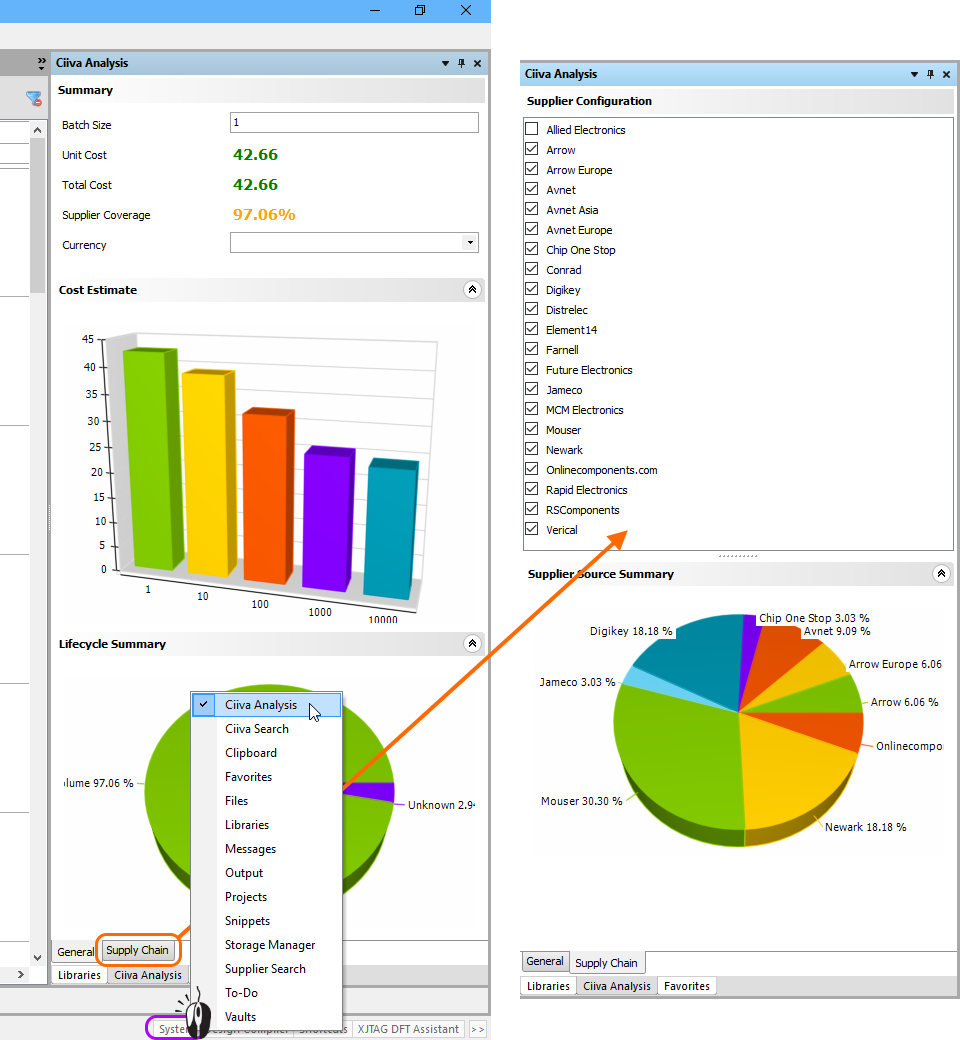
Enable your preferred Suppliers in the Supply Chain tab of the Ciiva Analysis panel. To display the panel, click the System button down the bottom right of the software.
Automated Part Analysis
To launch the part analysis and searching process, select File » New » Ciiva Part Analysis from the menus. As the Intelligent Content Detector performs an extensive analysis of all parametric data in every component, it can take some time to complete for a larger design. When the process is complete the results are displayed in a new PartsDoc document. A measure of the quality of the result of searching is given as a Confidence score for each part, use this to help focus your attention on the parts that may not yet have a correct solution.

The Intelligent Content Detector extracts data about the parts and then interacts with the cloud to locate potential parts, which it presents in the PartsDoc.
Changing the Proposed Component
Main page: Change Component dialog
You do not have to accept a part found by the Intelligent Content Detector. You are free to change a found part, and search yourself if the Intelligent Content Detector fails to locate a suitable part.
To change the proposed part, right-click on the part and select Change Manufacturer Component from the context menu. The Change Component dialog will open. The dialog has a tabbed region on the left where searched/suggested/favorite parts are listed, and a separate tabbed region on the right, which details the currently selected part, such as its technical parameters or supply chain.
The three tabs on the left have the following functions:
- Suggestions - this tab lists the components returned by the Intelligent Content Detector. Use this list when you have a match for the part but there is a problem with it, such as the part having a Lifecycle Status of
Obsolete, or there isNo Valid Source. - Search - Enter a search string to locate suitable parts in the Ciiva parts database.
- Favorites - a list of parts that you have saved as favorites. Right-click on a part in the Search or Suggestions tab to add a part to your Favorites list, right-click on it in the Favorites tab to remove it.
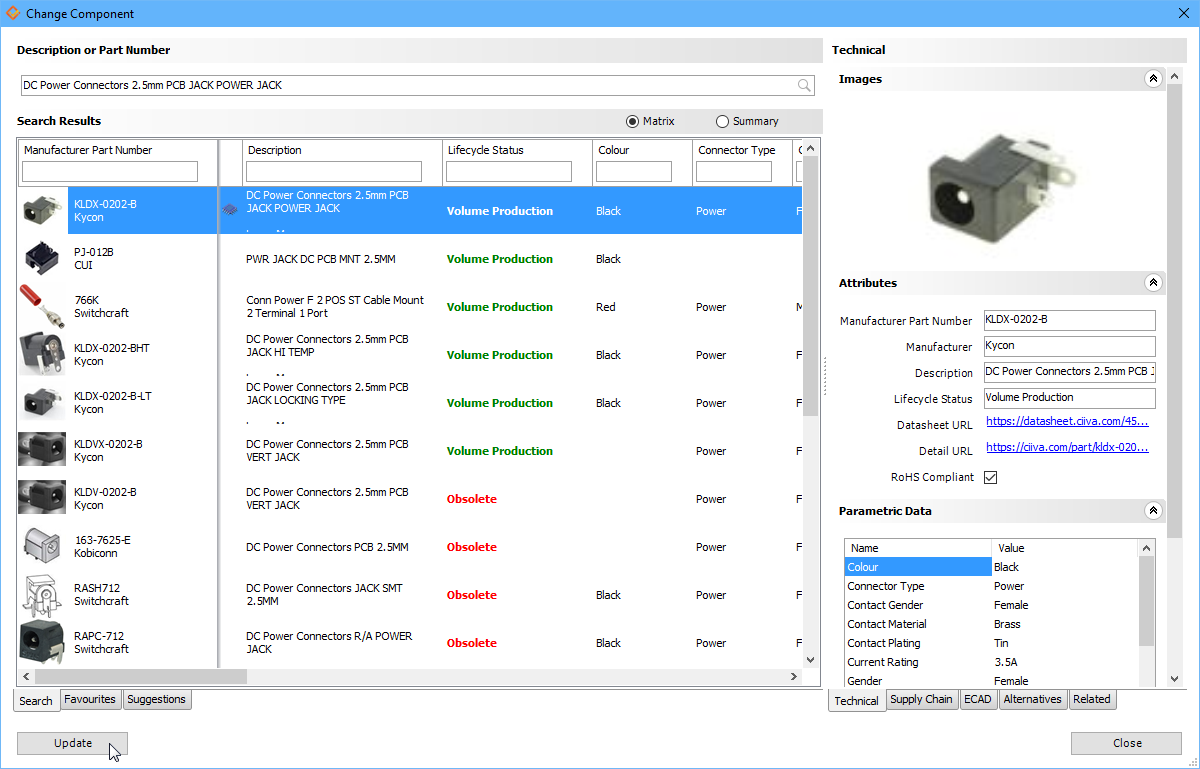
Use the Search tab of the Change Component dialog to locate a suitable part, then click Update to update the record in the PartsDoc.
Searching for a Part Based on an Existing Component Parameter
As well as opening the Change Component dialog and typing in a search string, you can also search directly using any existing text string displayed in the PartsDoc. For example, to search based on the original Description string, switch to the Design view, scroll across to make the Description column visible, then right-click and select Search for <Description_String> from the context menu. The search will be performed and the Change Component dialog will open, displaying the search results. Since the description string is now in the search field of the Change Component dialog, you can easily edit it and search again.

Search Ciiva using any string in the part, via the right-click menu.
Checking the Part Details in Ciiva
If you prefer to examine the details of a proposed part on the Ciiva website, right-click on the part in the PartsDoc and select View on Web from the context menu. Your preferred browser will open and display the Ciiva page for that part.

View the part on Ciiva if you prefer, via the right-click menu.
Changing the Chosen Supplier
The Supply Chain view includes a column for each enabled supplier. The lowest priced supplier (from those that are enabled) will automatically be chosen and shown in green.
There are two display modes for rows in the PartsDoc, select the More Details mode in the View menu to display all of the price-break details in the Supply Chain view. In this mode, 3 price-breaks are displayed, with a simple horizontal colored bar graph showing the relative price differences between the price-breaks.
To change supplier, click the radio button at the top left of the cell to set that part/supplier as preferred.
Many components can be purchased in different packaging, for example tape and reel, or trays. If parts are available in different packaging there will be a small pen-like icon displayed, click the icon to show the available supplier part numbers for the different packaging options. Click to select your preferred supplier part number in the menu, as shown below.

Choose the preferred packaging by selecting the appropriate supplier part number.
Analysis Complete - Updating the Design Components
Main page: Design Update dialog
The current state of synchronization between the design component and the PartsDoc part is shown in the Design Status column of the Design view.
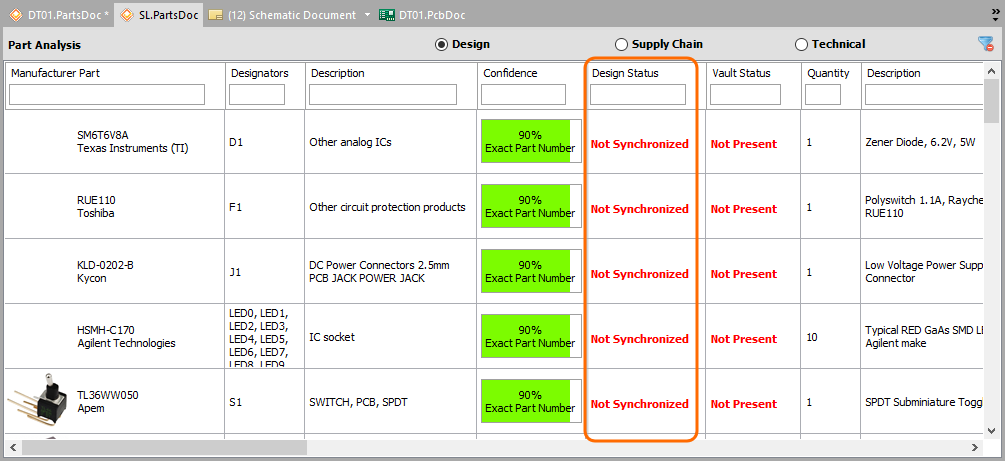
These PartsDoc parts are currently not synchronized with the schematic components.
When you are satisfied with the parts assigned in the PartsDoc, you can update the design components. Keep in mind that this process will replace the existing component data.
To launch the update process, select Update Schematics from the Design menu. The design is analyzed and the status Updating object model with design changes will be displayed. When the analysis completes the Design Update dialog will open, as shown below.
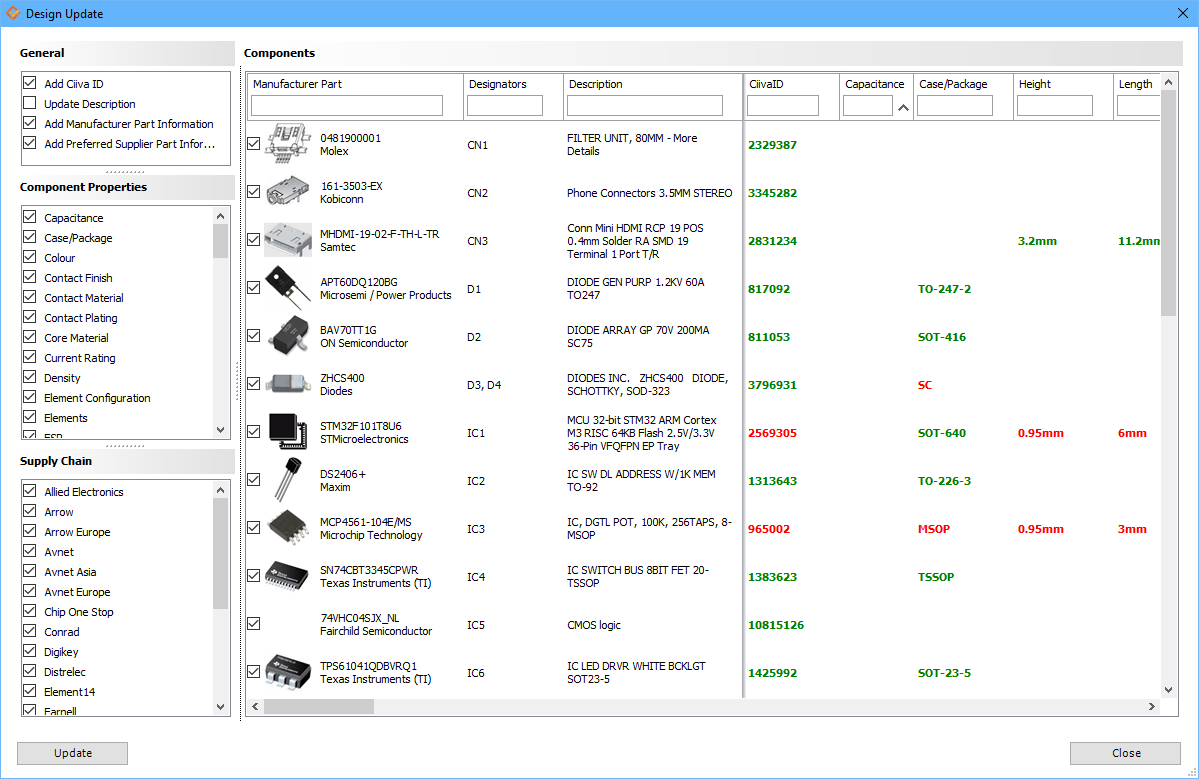
The Design Update dialog is used to configure what Ciiva part properties are to be pushed back to the design components. Green indicates the Ciiva details match the schematic part,
red indicates they are not matched and will be updated.
On the left side of the dialog you configure what properties get updated, on the right side of the dialog you configure which parts get updated. Each section has a right-click menu that you use to Select All or Deselect All. For information on a specific option, refer to the Design Update dialog page.
In terms of what gets updated, the process is:
- Schematic design component attributes - such as the Comment, Designator, Description, and the link to the Altium library component, are not changed. The only exception to this is the Description, which can be changed if you enable the Update Description option in the Design Update dialog.
- Design component parameters - existing component parameters that have the same name as a Ciiva Component Property will have their value changed if that Component Property is enabled for updating in the Design Update dialog. For example, if both the design component and the Ciiva part have a parameter called Wattage, then the existing Wattage value will be overwritten by the Ciiva value when the Update is performed. Ciiva Component Properties that are not present as design component parameters are added to the component. Existing design component parameters that do not exist in the Ciiva part are not changed or removed.
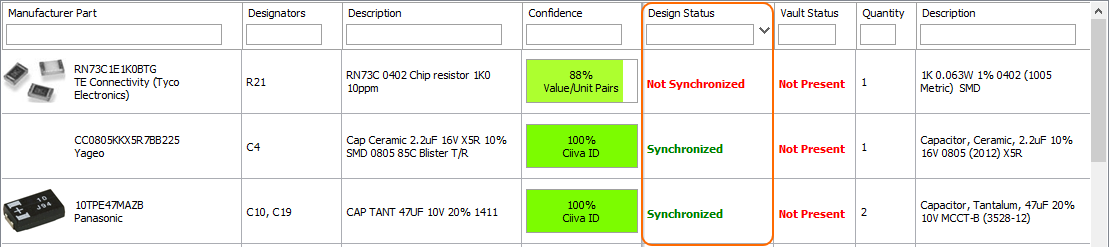
When the PartsDoc is in-sync with the design components, the Design Status column will show a status of Synchronized. In the image below all shown parts are synchronized, except R21. Note that the Confidence column shows that the synchronized parts are now using the Ciiva ID to relate the design component to the PartsDoc part, for this reason they now have a confidence of 100%.
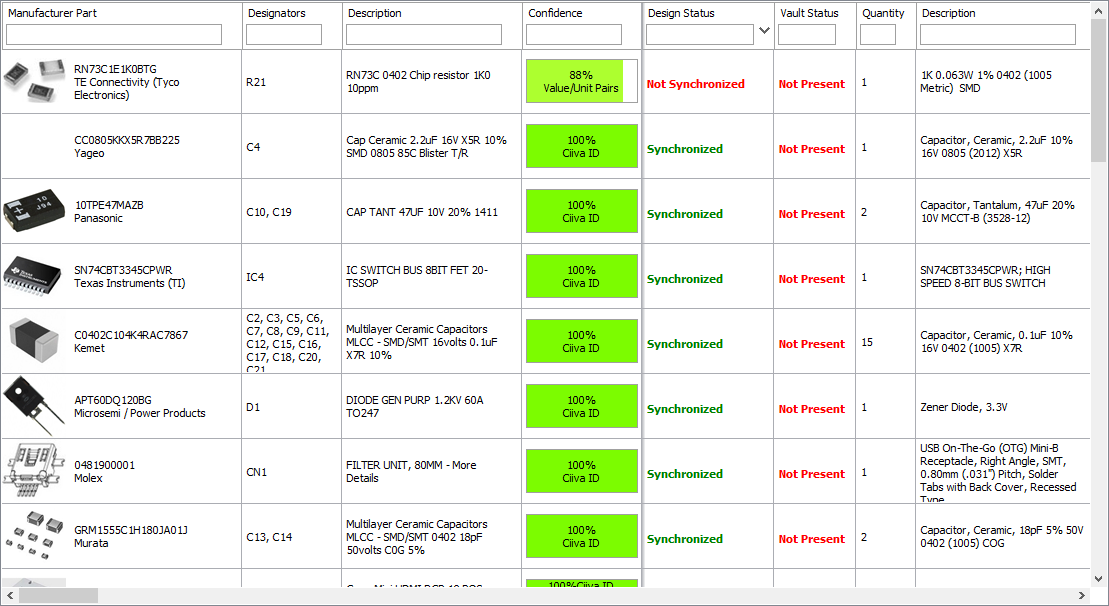
The Design Status shows that only R21 remains unsynchronized.
Bringing Design Changes in to the PartsDoc
The state of synchronization between the design component and the PartsDoc part is shown in the Design Status column of the Design view. If a component in the schematic design has changed, that change can be pulled into the PartsDoc by running the Design » Import Changes command, when the PartsDoc is the active document. Save the schematic before running the command.
The Import Changes process will:
- Read in the updated component data from the schematic
- Run the ICD to search Ciiva for a suitable part for this new component
Once the import changes process is complete, check that you are happy with the Ciiva part that has been chosen, and change it using the techniques described earlier, if necessary.
After doing this, the Design Status of the changed component will be Not Synchronized, as shown in the image below.
The PartsDoc has been sorted by the Design Status column, showing R21 is not synchronized (R21 on the schematic does not match R21 in the PartsDoc).
To complete the process, the last step is to use the Update Schematics command to push the new Ciiva part data back to the schematic component, as described in the Analysis Complete - Updating the Design Components section.
Managing your SmartParts - Synchronizing to the Vault
One of the strengths of the Ciiva SmartParts Search and Analysis technology is that it works directly from the components used in your design. With SmartPart technology you don't have to go through a laborious, library-management process, editing each component in your company library to add manufacturer and supplier details before you can use them. Instead, you run a SmartParts Analysis to find suitable manufacturers/suppliers in the Ciiva database, and link them directly to the parts used in your current design.
If you subscribe to the Ciiva SmartParts Management service, you can also retain this valuable information in a cloud-based storage resource - a hosted Altium Vault. The Vault is automatically created when you subscribe to the Ciiva SmartParts Search, Analysis, & Management service. Once you have connected your installation of Altium Designer to the Vault, then you're ready to go.
The Vault status of each part in the design is displayed in the Vault Status column of the Design view. For a part that has not been added to the Vault, it will display Not Present.

The current Vault Status is displayed in the PartsDoc.
To add the qualified parts to your Vault, select the Update Vault command from the Design menu. The Vault referenced in the Ciiva - General page of the Preferences dialog is checked for the availability of each part detailed in the PartsDoc, with the results being displayed in the Vault Update dialog, as shown below.

The Vault Update dialog is used to manage the synchronization state between the parts in the PartsDoc and the Items in the Vault.
On the left side of the dialog you configure options and properties for the new or updated Vault Items, on the right side of the dialog you configure which parts get updated. Each section has a right-click menu that you use to Select All or Deselect All. For information on a specific option, refer to the Vault Update dialog page.
Once the dialog options have been configured, click the Update button to push qualified components from the PartsDoc, into the Vault. When the update process completes, the Vault Update dialog re-opens, displaying the final status of each Item. As part of the update process the schematic sheets and PCB are also updated, to include the latest Vault Item-Revision details.